Overview
Themes
Components, Extensions, Folder Items and User Items
Undestanding WCMS Inheritance
Nested Themes
Choosing a Theme
Disabling Themes
Editing WCMS Settings
Sharing WCMS Settings (backup and restore)
Resources
The Web Crossing WCMS, or Customization Management Suite, is a set of tools for applying look and feel changes (Themes) to Web Crossing sites, adding features, or changing terminology or the language of the user interface.
The WCMS creates a group of settings for various options like colors, table cell widths, font characteristics, HTML fragments for a certain area of the page, etc. A Theme is simply a coordinated group of WCMS settings. You can either create your Theme by experimenting, "or you can install a Theme provided by Web Crossing or a third-party developer. Even if you install someone else's Theme, you can always tweak the settings to suit your needs. You can also export Theme settings to install on another site.
Components, Extensions, Folder Items and User Items
These are different types new features you can add.
All WCMS settings are inherited down the site hierarchy unless another, more local, setting overrides the parent setting.
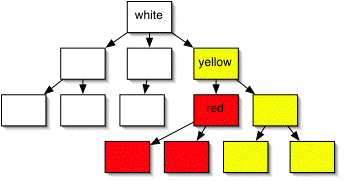
For example, see Figure 1. If your background color is set to white for the site, but a folder inside your site has a yellow background, the yellow folder and everything inside it will have a yellow background. If, however, you defined a red background somewhere in a folder inside the yellow folder, it and all its child objects will have red backgrounds.
Fig 1
This makes things quite flexible!
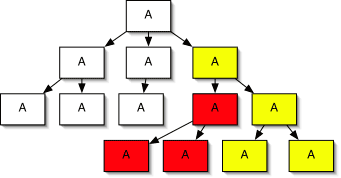
For example, see Figure 2. If you want all your folders to look alike, except for the color of the page background, you can create or install a top level Theme and then edit only the background color in each of the folders. However, all other settings continue to be defined from the top level. In Figure 2, all the text attributes are the same even though a different background color is defined. When you make a change to the text size or font, or some other parameter, all those other changes will be inherited down to all the inside folders since they haven't been specifically defined in those inside folders.
Fig 2
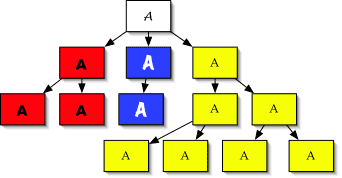
Or, (see Figure 3) you can assign a Theme to each of your top level folders, and have a completely different look and feel for each of them. In that case, anything you edit will appear only in the folder hierarchy inside that Theme.
Fig 3
Sometimes you'll want to use one Theme inside another. Remember that all the settings from higher up will be inherited unless they're overridden by more local settings.
For example:
Theme Manager allows you to choose the page wrapper, the material which wraps around the content area in the center of the page, and comes with some coordinated color definitions for page content. In the initial site setup process, you will be prompted to choose a Theme from a number of screenshot thumbnail graphics. If you click one of the screenshot thumbnails, a larger image will pop up, with annotations regarding that particular Theme. A ReadMe link will reveal more details. A number of color options are available for each Theme.
Along with the usual Theme choices, there is an option for "Empty Theme" and "Themes Off." "Empty Theme" turns on the page-wrapper, but all the settings are blank, so you can start with a clean slate to create your own Theme. "Themes Off" turns off themes so that you can use other methods of laying out your pages. If you choose this in the initial setup process, you will go instead to a page where you can choose buttons and a background color for your site.
When you go back to the Theme Manager after initial site setup, you will see two choices by the Install button: Start from scratch, and Attempt to preserve as many existing settings as possible. If you start from scratch, all your existing settings will be overwritten with those of the new Theme. If you have done work on the navigation column, multi-purpose colum, or top or bottom cells that you don't want to lose, you can attempt to preserve these settings if you wish.
Tip: to save your existing settings before making changes, (so you can go back to them if you wish), you can export a configuration file and reimport it late to restore your settings. See Sharing WCMS Settings below, for details. |
After initial site setup, you can reach the top level Theme Manager's "Choose a Theme" form by going to the Control Panel > Theme Manager menu > Choose a Theme.
To reach the Theme Manager in a folder, first click on Edit Folder, and then you will see the Theme Manager menu.
If you don't want to use the WCMS, you don't have to. Customization can also be accomplished by placing HTML into the Banner and Footer fields in the Control Panel and choosing buttons from the control panel. See the Tables page for some ideas.
To turn off the Themes, simply go to Control Panel > Banner/footer page and turn Themes off.
If you change your mind later and decide you do want to use a Theme, turn it back on in the same location.
Even if you turn off Themes, you can still select and edit the other WCMS plugins from the WCMS Manager menus.
Most WCMS settings can be edited. For the top level, you can find the various settings under a popup menu in the control panel. Pop up the Theme Manager menu to find "Edit Theme Settings." Similarly, pop up the Component Manager menu to find edit options for the Top Level, Folder View, Message View, and Toolbar. The Extension Manager, Folder Item Manager, and User Item Manager menus each have an edit screen for each extension you have installed.
Themes have 5 editable table cells: Top cell, nav cell, content cell, multi-purpose cell, and bottom cell. All these except the content cell have an "optional items" menu where you can turn on various links and elements (a search blank, a user counter, a login link, etc.). To turn these on and off for each cell, use the "Optional Items" menus in each cell. Moreover, the nav and multi-purpose cells are both optional, giving you a choice between a single-column view, a two-column view, and a three-column view. You can even swap the multi-purpose cell and the nav cell if you want to.
To find these menus and settings for a folder, use the Edit Folder screen.
When you're in a folder, for each of these settings you can edit either the value there or the click a link to be taken to the edit screen at the location from which the value is inherited, if you want to edit all occurrences of that value in the hierarchy rather than that one local value.
When you get ready to submit the form, you have several options:
For more information on WCMS inheritance, see the Inheritance section above.
Tip: If you want to remove or add the background "pinstripes," locate the /webx/html/plugins/bgs directory on your server. In that directory are a number of different background stripes and patterns you can use in customizing your Theme. To invoke one of these images for a background, fill in "/plugins/bgs/image.gif," for example, into one of the Theme background color fields. |
Sharing WCMS Settings (backup and restore)
You can share your settings with another site, or move them from your development site to your production site, by exporting them to create a wrapper.set file. You'll find the Export/backup form in the Theme Manager > edit theme settings page. If you want to export top-level settings, use the Export option in the menu right there in the control panel. If you want to export folder-level settings, go into the Edit Folder page for the folder, and use the Export menu there.
Once you're on the correct Export page, choose a filename. The usual naming convention is to use a ".set" file extension, but you can really name it anything you want. (If you're a developer creating Themes for distribution, please see the Developer WCMS SDK page for additional instructions.)
Click Export. A text file of Theme settings (all Theme, component, and other WCMS plugin settings) will appear in your Web Crossing server directory.
If you have images or custom templates which go with your Theme, be sure to send those along when you share the wrapper.set file and tell the recipient where they need to go.
To Import the settings file on the other server, place the images and template files where they are supposed to go. You'll find the Import/restore form in the Theme Manager > edit theme settings page.
If you have a ".set" file (with or without associated images), you can use the Import menu option. Fill in the name of the ".set" file in the Import page at the level at which you want to assign those settings (top level vs. a folder), and Import the settings. After you do this, your "Choose a Theme" page will not show your Imported Theme, but it will be completely functional in every other regard. If you need to use this Theme in some other folder, you'll need to re-Import it there.
Sysop Control Panel
Sysop Documentation