Overview
and Basic Features
Setting Up to Serve Chat
Adding a Chat Room
Using Tables
Host Commands
User Chat Preferences
Troubleshooting
Resources
Web Crossing Chat provides a number of interesting features which are detailed in the Sysop Documentation.
These include:
To serve chat from your Web Crossing server, go to the Control Panel > Chat Services page.
Below the certificate field is the web server configuration information. You'll need to know - or be able to find out, from your web host or server administrator - the IP address for your site. Type it into the field provided. Check Provide chat services from this Web Crossing Server. Choose a port you know isn't being used by something else on your server. Ask your server administrator if you aren't certain.
The bottom field tells Web Crossing where users will download the applet files from. Due to Java security issues, this needs to be a location within the same IP address you listed above. Normally, unless you have a nonstandard setup, the WBChat folder, which contains the applet and associated files, will be located in your Images directory and the default path, which is is prefilled into the form field, should work.
Click Set Chat Services. An Add Chat button should now be available to you in the discussion area.
Thereafter, you can use the Control Panel > Chat Status area to monitor how many chatters you have and get an overview of your server configuration.
Once you are set up to serve chat, you can use the Add Chat button to add a chat room.
You'll be asked for a title for the chat room. You'll notice that when the room is up and running and you enter it, you get an automated welcome message that says, "Welcome to the XXX Chat Area," where XXX is the title of the room you chose. Be aware that it's easy to choose a name that sounds redundant when it's inserted into that automated message. For instance, if you title your chat room "Web Crossing Harbor Chat Room" the welcome message will say: "Welcome to the Web Crossing Harbor Chat Room Chat Area" - which is more than a little redundant!
If you're using a template to customize your chat room, type in the name of the macro on the next line.
The sort sequence number is next (it's optional).
The last checkbox is a choice for whether or not you want to allow anonymous chatters. If you do, you will have less control over disruptive members because you won't know who they are!
Once you click OK,
your chat room will appear in the list of folder contents with a chat icon ![]() next
to it.
next
to it.
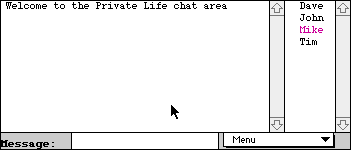
See the screenshots just below to see what your room will look like when you enter it.
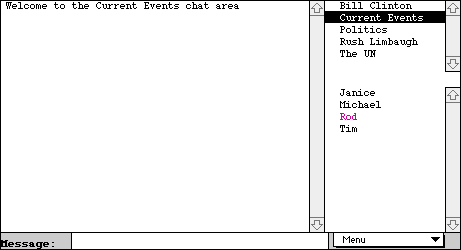
The large pane at upper left is where chat appears. The "message" area at the bottom is where chatters type their comments. Pressing "return" or "enter" on their keyboard will send the comment to the room. The list of participants appears in the right pane, and if you have more than one chat table set up, the list of tables will appear at upper right. (Figure 4, below.)
The menu popup contains a number of commands, including those for sending private messages, creating private rooms, showing/not showing entrances and exits, playing/not playing the entrance/exit sound, etc. You can configure most of these options in the applet parameters with a customized template.
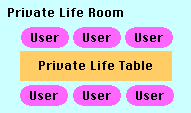
Figure 1 - private life table analogy

![]() Web
Crossing uses a "room with tables" analogy for its chat area.
Web
Crossing uses a "room with tables" analogy for its chat area.
If you set up a chat room by itself, it consists of one room with one table where people can converse. In this example, the Private Life Room is the main room, with one table, the Private Life Table, with six chatters.
The default
Private Life Room would appear like this
to the user:
Figure
2 - Private life chat room

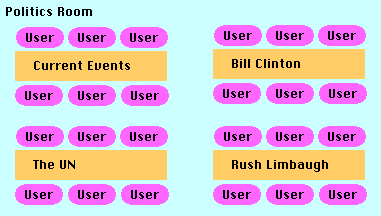
However, if you set up more chat rooms, it's possible to link them so that one of them is the main room, and the others tables within that main room.
Figure 3 - room with tables analogy

In this example, the Politics Room is the main room, and Current Events, Bill Clinton, The UN, and Rush Limbaugh are all tables within that main room.
In this room, the four tables and the main room name would appear in the upper right corner of the chat window, and users can jump from one table to the other by clicking on the table name, without reloading the whole applet.
Figure 4 - room with tables

To set up multiple tables in a room, create as many rooms as you want tables. Then go to the Edit button next to each chat room listing in its containing folder.
In the "Main room for this table:" field, type in the seven-digit uniqueID number for the containing, main, room. Be sure to include the leading period.
Once you have all the rooms linked in this way, entry into any of them will show the names of all of them at upper right, and you can jump between them easily.
Overflow Tables: If you click on the small Edit button next to the name of the chat room in the containing folder, you'll find an option to list how many users you want to allow in the room before Web Crossing automatically creates another table to hold them. The default is 32.
There are several host commands you can type from the "message" line when you're logged into the chat area as host or sysop. (See Sysop Documentation for more detail.)
Note: These commands are not served to users attending via the HTML chat interface, nor is it possible for the host to send these commands via the HTML interface. |
To close the room:
This puts a graphic image over the top of the chat square, effectively closing the room. This can also be used for promotion of future events, advertising, etc.
To reopen the room:
This removes the graphic so chat can resume.
To change content around the room:
If you have the applet displayed in a frameset, you can display an image or HTML page in a different frame in the frameset. (See Web Tours for details.)
To turn on client logging:
This works only if you have the Master Log switch turned on in the Control Panel > Log File area. If enabled, it writes extra chat information to a "LogNN" file in the webx system directory (where NN is a number).
The Preferences page has options for the user to choose his or her preferred chat interface, HTML/Javascript or the Java Applet. If a registered user hasn't yet made a choice, the Java applet is served as a default.
Guests will be served HTML chat if they are allowed in the chat room at all.
I can't connect to the chat server from my browser
Sysop Documentation
Web Crossing FAQ: