Editing the Body Tag Colors using Theme Settings
Control Panel Body Tag Settings: Background
Control Panel Body Tag Settings: Link Colors
Control Panel Body Tag Settings: Other Body Tag Code
Troubleshooting
Resources
Editing the Body Tag Colors using Theme Settings
You can change text and link colors on the Theme Manager > Edit Theme Settings > Global Settings page and through the Quick Configure page without getting your hands dirty in HTML, or by editing the body tag directly in the Control Panel > Banner/footer page.
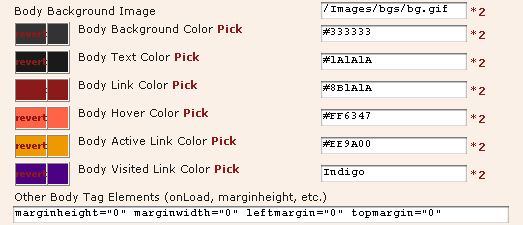
Whichever method you choose, the basic idea is the same. In this example, from the Theme editing area, you can set the colors either by typing them in directly (either a named color, like "red" or a hex color number, like "#FFFFFF") or by clicking Pick, which pops up a window with color swatches. If you change your mind after selecting a swatch, you can click the revert link to go back to where you started.
The color settings are also on the Color Summary Page in the Edit Theme Settings area.
Figure 1 - Screenshot of Edit Theme Settings > Global Settings

Using the Control Panel > Banner/footer page to set the page background
To install a custom background image, first place the image into your Web Crossing images directory, or in some other browser-readable directory on the web.
Then go to the Control Panel > Customizing > Banner, footer, background, and top-level-page appearance, toward the bottom of that page.
The text there says: "URL for background pattern, or #rrggbb for background color"
If you're installing a background image, type either a relative or absolute URL to your background image into that blank.
If you simply want to change the background color, type in the hex number of the color you'd like to use. Be sure you precede your color name by a pound sign: #. If you wanted a black background, for example, you would type in:
#000000
Web Crossing will interpret it as a bgcolor entry if it begins with a hash mark (#) and as a background image entry otherwise.
Click Update Top-Level Settings at the bottom of the page, and the page will reload and display a sample page with your new settings, including your new background. If you like what you see, click OK at the bottom of that page. If you want to make further changes, use the Back button in your browser to go back to the Edit page.
Using the Control Panel > Banner/footer page to change the link colors
You can also specify link colors in the same space, by putting additional hex numbers. You can add:
LINK=#FF0000 VLINK=#FFFF00 ALINK=#FFFFFF
or anything else you'd normally put in a Body tag.
Be sure to specify your background color or image first, before you add any link color changes, or your colors won't be displayed correctly.
When you're done, click Update Top-Level Settings.
Figure 3 - Screenshot of Sysop Control Panel with tags for a background pattern and custom link colors

Using the Control Panel > Banner/footer page to add other body tag code
You can put other code into the body tag, such as style sheet information, topmargin or leftmargin settings, etc., with a maximum of 250 characters total.
My background image doesn't show up.
My link colors don't show up right.