Selecting Images
Finding the Images Directory
List of Buttons/Icons, and File Formats
Button Sizes and 5.0
Installing New Buttons
Troubleshooting
Resources
Themes all come with pre-selected button sets which match the rest of the design. However, you can go back at any time to choose new buttons in the Quick Configure page, or in the Theme Manager > Edit Theme Settings > Global Settings page. With nearly three dozen button sets and 8 icon sets, you'll probably find something you can use for almost any situation. But if you're creating your own Theme, you may want to replace the built-in buttons altogether with buttons or icons that match what you've done. If you're localizing, you'll need to add a set of buttons for each of your additional languages. (See the Localization section for details and information on where they should be placed.)
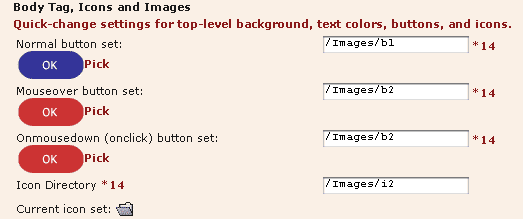
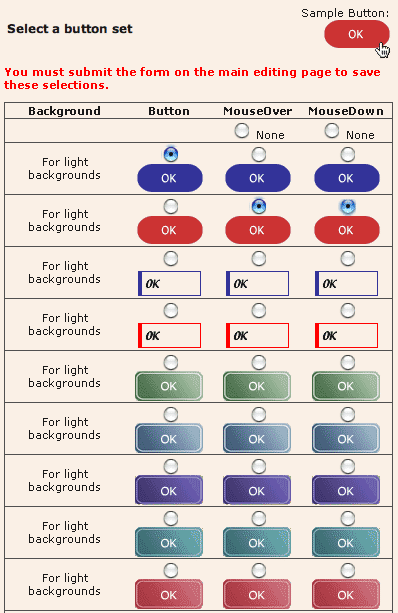
If you use the Theme Settings page to choose your button sets, you can define an additional mouseOver button set and an "onClick" set. If these are defined, the toolbar buttons as well as the other buttons will change onMouseOver and onMouseUp. Figure 1 shows the Theme Settings page; Figure 2 shows the window which pops up when you click "Pick" next to the button on Figure 1.
Figure 1 - Screenshot of Global Theme Settings, Choose Button Sets
Figure 1 - Screenshot of Global Theme Settings, Button Chooser Popup Window
The buttons and icon images are stored in the images directory, which you specified during installation, and which may or may not be actually called "Images," depending on how you set it up at installation. If you've forgotten where they are, you can look in the Control Panel > General Settings.
Figure 3 - Screenshot of General Settings, icon and image directories
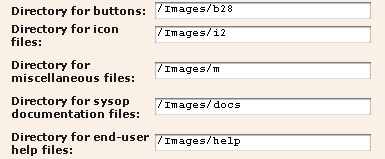
The images directory itself actually has several subdirectories in it, and the path to each is listed in the General Settings panel as well. These settings reflect the current button sets in use, whether they were set by a Theme or using the Quick Configure page or a Theme settings page.
List of Buttons/Icons, and File Formats
There is a list of the buttons you'll need, including the text on them and their functions, in your sysop documentation. If you have any plugins installed which add buttons, you need to make those as well.
Be sure you create your new buttons and icons with the same names as the default images, or Web Crossing won't find them later. They'll all need to be .gif files as well.
With 5.0, it is no longer necessary - or even possible! - to set image sizes in the control panel as before. The server automatically reads in the size information from the image file itself and writes the image tag height and width to match. However, if you have some old templates which use the old button code, and you anticipate possibly switching to a different button set than you've been using all along, you will want to update those templates to use the new, 5.0-specific button code. If you don't have any custom templates left over from previous versions, you don't need to do anything to set button sizes.
Here's an example of a button call for an OK button, using 5.0 code:
				<a href="%% urlBase %%14@%% certificate %%@%% location %%">

				%% set id "ok" %%%% use getAttr %%

				%% "ok.gif".siteImagesImg( user.language, "lang".jscall( "extn", "btnok" ), "border=""0"" hspace=""0""" & attr ) %%

				</a>%%nop%%
Please see the WCMS developer documentation for more details
If you need to know about button sizes:
Buttons come in two basic sizes:
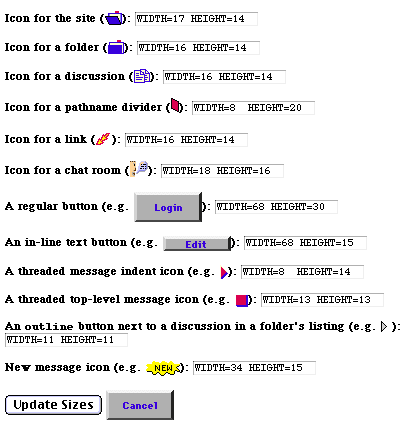
You can create your new buttons in any size you want, as long as all the larger ones are the same size, and all the smaller ones are the same size. Take note of the size you created, because you'll need to tell Web Crossing about it later when you're ready to use them. If you want to know the sizes of the default buttons, you can find the sizes in the Control Panel > Custom buttons & icons.
For the other small icons, it's not essential that they're all the same size. You'll be able to specify the size when you're ready to use them.
You can replace the contents any of the 29 button directories with your new images, and any of the 8 icon directories with your new icons. Or you can add a new subdirectory within /Images. If, however, you want to be able to select your buttons with the Quick Configure or Edit Theme pages, you'll need to edit the webxButtons.cfg file in the webx directory. Study what's there, and follow the pattern established to indicate image sizes, and then when you next use the Quick Configure or Edit Theme pages, page, your new buttons will be there.
When you're ready to install the new buttons, upload them to the correct directory using your FTP program. Be sure to save backup copies of the old files if you're replacing any old images, because they'll be overwritten and deleted when you upload your new buttons with the same names as the old ones. After they're installed, go to the Control Panel > General Settings and indicate the directory you've chosen.
Note: If you created new buttons or icons and have not edited the webxButtons.cfg file, you will not be able to choose them by using the Theme Settings "Picker" page or using the Quick Configure page. You'll have to type in the directory name, either in General Settings or the Global Theme Settings page. (In addition, to select them via the Quick Configure page, you also need to create a "buttonrow" image. Look for buttonrow.gif in any of the button sets, or iconrow.gif in any of the icon sets, for an idea of what's needed.) |
Unless you're running in CGI mode, you'll have to reset the file cache (Control Panel > Reset file cache for HTML files and webx.tpl templates) to see your new buttons. (If you're not sure which mode you're in, it won't hurt to reset the cache anyway.)
Control Panel > Custom buttons & icons. Your new buttons should show up next to the form fields if you've put them in the proper places and named them correctly, but the sizes may be distorted. If so, you will need to fill in the height and width of your new buttons. When you click the Update Sizes button on that page, you will tell Web Crossing to display them at the new sizes.)
Figure 4 - Screenshot of Sysop Control Panel with buttons displayed
I'm getting a broken image icon in my browser where the image is supposed to be.
I uploaded my new buttons, but I still see the old ones.
My images display, but the shape is distorted.
Note:
If you can't log in because there is no Login image to click
on, use this trick from the syosp
documentation: Log in using: |
Web Crossing FAQ: